ok so i took the time to sit down and build a good piston valve. it cost about $15.00usd and it took me and my dremel less then 2 hr's from start to finish. but for anyone that as not played with a piston valve let me tell you something the amount of raw power you get is crazy. after this i don't think i will build a gun that has anything but a piston valve. for $15 i know i cant find a better valve.
but im here to see what all of you think of my new valve
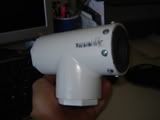
its all in a 2'' sch 40 T with a 1 1/2'' port
-the piston is a 1 1/4 coupling
-the end cap is a sch 80 2''x1''npt bushing with some mod work on it
- and a 1/4'' ball valve for the pilot
i put some parts from other guns on it to test it. i did 4 dry fires at 100 psi and shot 2 potatos at 110psi but all in all it works great .
<a href="http://photobucket.com" target="_blank"><img src="http://i87.photobucket.com/albums/k154/ ... C01654.jpg" border="0" alt="Photo Sharing and Video Hosting at Photobucket"></a>
<a href="http://photobucket.com" target="_blank"><img src="http://i87.photobucket.com/albums/k154/ ... C01653.jpg" border="0" alt="Photo Sharing and Video Hosting at Photobucket"></a>
<a href="http://photobucket.com" target="_blank"><img src="http://i87.photobucket.com/albums/k154/ ... TS2010.jpg" border="0" alt="Photo Sharing and Video Hosting at Photobucket"></a>
<a href="http://photobucket.com" target="_blank"><img src="http://i87.photobucket.com/albums/k154/ ... TS2011.jpg" border="0" alt="Photo Sharing and Video Hosting at Photobucket"></a>
<a href="http://photobucket.com" target="_blank"><img src="http://i87.photobucket.com/albums/k154/ ... TS2006.jpg" border="0" alt="Photo Sharing and Video Hosting at Photobucket"></a>
1st piston valve
-
unisonmind

- Specialist

- Posts: 118
- Joined: Wed Jan 24, 2007 9:25 pm
-
keep_it_real
- Specialist 3

- Posts: 320
- Joined: Sat Dec 23, 2006 4:41 pm
- Location: Bend, Oregon
That's sweet. I like it.
What's on the inside. Is there a piece of pvc that the piston slides in? I assume works like a barrel sealer right?
I know this is somewhat noobish so sorry.
What's on the inside. Is there a piece of pvc that the piston slides in? I assume works like a barrel sealer right?
I know this is somewhat noobish so sorry.


what is that last picture, i know its what seals the end, but what is it made of?
that is a beautiful valve, its better looking than mine, it probly preforms about the same as mine, but looks a lot nicer.
keep it real- yes thats how the valve works, the piston it in a piece of 2'' pipe at least i think it is... it doesnt work LIKE a barrel sealer, it IS a barrel sealer.
edit- i cant read your avitar, whats it say, the one with the bathroom door girl on it?


-
unisonmind
- Specialist
- Posts: 118
- Joined: Wed Jan 24, 2007 9:25 pm
keep it real- yes there is a piece of 2'' pipe in the T for the piston to slide in.
hi- the end cap is a Nibco 2''x1'' threaded
bushing that i cut down and i grinded the hex head flush
surfbum- i got the o-rings from lowes there in pluming 1 1/2 but it takes some work to get them over the 2'' bushing.and here is a pic of my avitar
<a href="http://photobucket.com" target="_blank"><img src="http://i87.photobucket.com/albums/k154/ ... dwoman.jpg" border="0" alt="Photo Sharing and Video Hosting at Photobucket"></a> -a good woman--a great woman-


-
Kenny_McCormic
- Specialist 2

- Posts: 283
- Joined: Wed Jan 03, 2007 8:59 pm
probably chucked the piston in a drill and used a file to cut the grove.
How do people put their pistons in drills though?! I have briefly tried to do this before, but I can never get the piston to stay in straight. My pistons are all solid plastic rod. Anyone have any suggestions for me? Having the ability to add o-rings to 2" pieces and below would be a HUGE asset for me...
-
unisonmind
- Specialist
- Posts: 118
- Joined: Wed Jan 24, 2007 9:25 pm
rmich732-on my end plug i put the groves in with my dremel and a steady hand but on your solid rod you can drill a hole in it. put a bolt in and a nut to hold it still. thin put the bolt in the chuck on your drill
-
AmYisroelChai
- Specialist
- Posts: 117
- Joined: Thu Mar 29, 2007 10:50 am
rmich
Anyone please correct me if I am wrong here:
If I am correct they put a bolt through the center of the piston extending past the piston at least ½” they then put the extended part of the bolt into the chuck of the drill.
In this case however the O-Rings were not cut into the piston itself. Rather they were put in the 2” Endcap. This prevented the Air from escaping out the back. Since remember it is only screwed in not glued.
Kenny_McCormic
Rmich- If you want o-rings on something there is the bolt idea I mentioned above. There is also the idea of using a Drill Press. Basically clamp down Two pieces of wood to the press whi will hold the [insert here what ever your cutting a groove into] in place. Two pieces of wood: Because one is for the Depth of the O-ring – you don’t want to go to far in. The other wood will hold the piece your cutting into in the exact place you want the O-ring to be.
unisonmind- I have a question for you (it’s a little noobie
What fitting did you use on the top on Front of the 2” T?
(Also if its not too much to ask “Why?”)
VERY NICE PISTON.
How do people put their pistons in drills though?! I have briefly tried to do this before, but I can never get the piston to stay in straight. My pistons are all solid plastic rod. Anyone have any suggestions for me? Having the ability to add o-rings to 2" pieces and below would be a HUGE asset for me...
Anyone please correct me if I am wrong here:
If I am correct they put a bolt through the center of the piston extending past the piston at least ½” they then put the extended part of the bolt into the chuck of the drill.
In this case however the O-Rings were not cut into the piston itself. Rather they were put in the 2” Endcap. This prevented the Air from escaping out the back. Since remember it is only screwed in not glued.
Kenny_McCormic
If you look again the piston itself has no O-Rings on it.probably chucked the piston in a drill and used a file to cut the grove.
Rmich- If you want o-rings on something there is the bolt idea I mentioned above. There is also the idea of using a Drill Press. Basically clamp down Two pieces of wood to the press whi will hold the [insert here what ever your cutting a groove into] in place. Two pieces of wood: Because one is for the Depth of the O-ring – you don’t want to go to far in. The other wood will hold the piece your cutting into in the exact place you want the O-ring to be.
unisonmind- I have a question for you (it’s a little noobie
What fitting did you use on the top on Front of the 2” T?
(Also if its not too much to ask “Why?”)
VERY NICE PISTON.